Monday, June 25, 2012

Book Wreath Tutorial

I've come across several different kinds of book wreaths but this style called my name.


I didn't want to spend a lot of money on this so I went to the dollar store and came home with:

A pretty large book
Two rolls of 2 1/2" satin-ish ribbon
A small package of Glue Sticks
One of those green florist rings

The green ring had square edges so I took a kitchen knife to it and carved until the edges were round.  I didn't worry about the back side, just the top outside and inside.  It was messier than I thought it would be but in the end wasn't too bad.

I wasn't sure if hot glue would stick to the green florist ring very well so decided to wrap it with one of the rolls of ribbon.  The ribbon turned out to be a good call as a friend assured me hot glue would not have worked well.  Plus, this ivory ribbon was much better peeking through than the green would have been.


Next I took the cover off the book and started cutting out pages with a box knife.


After a while, the pages started getting smaller as the parts of the pages left behind got thicker.  Eventually I cut the spine with my kitchen scissors and was able to take the pages out like it was a tablet.  Much Better.

Next, I stacked about 6 pages and cut out large circles.  I tried drawing a circle first but ended up just freehand cutting them as it was easier for me.  Feel free to use a small bowl or plate to trace around.  I did try cutting out an oval to use more of the page but found out that made for some really wild flowers that were harder to roll.

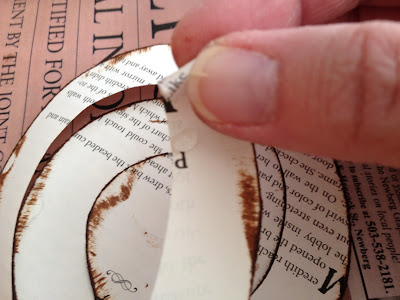
Next, I cut the circles in a spiral. I tried drawing this first but again, it was easier to freehand cut them. I liked that each set of 6 or so were different as I never cut the spiral exactly the same. I did also discover that the center should be fairly small.


Next, I took the curly-cue pieces and rubbed the outside edges on a brown distressed ink pad to give the flowers an aged look.


This step is optional.  Here you can see what the flowers look like with and without the ink.


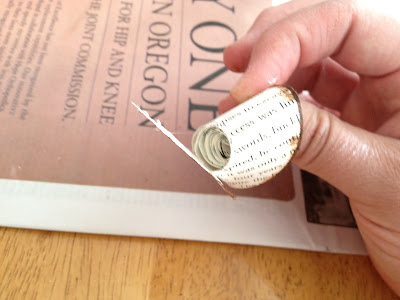
Next, grab the skinny end not the fat middle and start rolling.


Every couple of rolls, put a small dot of hot glue.  Ignore my sad looking hands and split thumbnail!


Keep rolling until you get to where only the middle circle is left.


Use that bottom flap/circle to make the bottom of the flower.  Add a glob of hot glue and press down.  I used a scrap piece of wood to protect my table.


Now is the fun part.  The last part was the slightly tedious part.  My son is in next year's High School Musical, Fiddler on the Roof so we watched the DVD while I was cutting, inking and rolling.  Nice!


My husband thought it didn't look too bad with just a few flowers on the wreath so that's an option as well.  I ended up using about 85 rolled flowers.


Taaaa Daaaaa!


It's driving me crazy that I didn't trim the ends of the ribbon before I took this picture!

Have Fun!


Monday, February 13, 2012

Hero

I have a new Hero in my life.  Her name is Kyra.  She is my niece.  She is beautiful.  She is a teenager. 

I was privileged last week to witness the birth of Kyra's baby boy.

It was a crowded room.

Kyra, her Mother (my sister), her Grandmother, two sisters, a cousin, two Aunts and her boyfriend were there. 

We were all there to cheer her on as she delivered a precious little person. 

We had tears in our eyes.  One, because it's a miracle to witness and two, because a teenager shouldn't be going through something so huge and life altering.

Sure, Kyra made choices that let her to this hard time in her life.

It's not my place to judge her.  It is my place to love her.

Kyra had her baby boy on a Thursday and on Saturday, she did one of the hardest, most courageous things she will ever do in her life.

My hero, chose a wonderful family to adopt, love and raise this sweet child.  I think she chose well.

I was asked to make a quilt to go with him to his new family.  Kyra, her Mother and I met at the fabric store and she picked out some cute fabric.  I was honored.  It was hard to sew while trying to keep my eyes dry.


Kyra, you are my Hero and I love you.


Wednesday, January 11, 2012

I'm the only girl in my house.

Since the day I got married 25 ½ years ago, I’ve been the only girl in my house.  I’ve been thinking of some of the benefits and decided to list a few.

I have several friends with the same one-sided gender household.  Feel free to add to the list!

1.       My makeup stays in my makeup drawer.
2.       I don’t have to share my shoes.
3.       At rest stop bathrooms, both boys go with Garth and I get to go in alone.
4.       I get to watch more documentaries about war and guns than I ever thought I would.
5.       Although it hasn’t happened for a few years, I got to spend time on the floor playing with Knex and Legos for hours while having great conversations about bugs and the like.
6.       I don’t feel the extreme need to shout “I call that …(insert name of cool car here)” while driving around town.
This one happens to be Jensen's favorite.  I think if he saw one in real life, we'd have to potty train all over again...

7.       I get to have a G.I. Joe Christmas tree topper.
Our 20+ year old star tree topper died last year.  This year our tree had a double top so what else could we do?  It made me happy every time I looked at it!

8.       I get to help my sons with Cub and Boy Scout stuff.
This is from this last year 2011

9.       Bathroom humor is actually kind of funny.
10.   My boys are trained to respect my Dooney & Bourke and Coach and bags.  Jensen has been known to point out a Coach bag or two on t.v. shows.  Garth is really proud of that one.
11.   I don’t have to kill all the spiders.
12.   I usually don’t have to lift heavy things.
13.   I’m able to take a small bit of pride in a loud belch.
14.   I have 3 handy jar openers.
15.   Nobody wants to ride my pink bike.  Although Gordon has ridden it a time or two in a moment of desperation.

Ahhhh, I LOVE my life!

Monday, September 26, 2011

A past due Post and a Goodbye

First, let me just say, Wow! It’s been a long time since my last blog post! Over the summer I just kept thinking I’ll do that tomorrow or later today…. Obviously that never happened. I’ll have to do a “Make up” post and tell you about all the fun we had over the summer.


Does anyone even really read this thing??

Near the end of the school year, Jensen needed help making an Oregon Trail project. He wanted to make a covered wagon like Gordon did when he was in 4th grade. Really, it almost isn’t fair to the other kids who don’t have a wood loving Mother!  Do I sound a little bit conceited?

We went to the garage together and I cut some circles out of ¼” wood for wheels with my band saw. This is after we used every lid and bowl in the cupboard to trace around until we found just the right size. We carefully marked the placement for the spokes. I was all ready to cut out the little triangles so they would actually look like wagon wheels. It worked well for Gordon’s last time.


We walked over to my scroll saw with our safety glasses in place. I turned on the light over my workbench and then pulled out the power knob to start the saw. Nothing. Not one movement. No smoke. No burned smell. Just nothing. We turned it on and off a few times and still nothing. It was dead. Really dead.


How can I express my sadness at this loss? I can’t even begin to count the many hours I’d spent cutting pieces of wood to cut and paint.


It was a Christmas gift from my Dad 17 years ago.

Christmas 1994 found me in a very sad state of mind. I had just had my second and third of our 5 miscarriages. We were living in Orem, Utah and Garth was going to graduate in April.

I was so sad and really felt sorry for myself. It didn’t help that around the same time that lady in the south admitted to drowning her two boys in her car and that she hadn’t been car jacked.

I really don’t remember why Garth was already in Oregon but I flew to Oregon to join him for Christmas. I was so excited when I received this saw! I spent many hours learning how to use it. It probably sounds a little strange but that little saw really helped me on the road to healing my mind and testimony.

Anyway, here we were last May/June and we didn’t have a saw that could cut out wagon wheels! Of course we were on a time limit and couldn’t just go to the hobby store and buy some pre-made wheels.

We ended up building the top of the wagon and then taking Gordon’s apart. We used the base of his with the wheels. Jensen’s wagon itself is made from some old cedar fence boards to give it a nice rustic look. We were very pleased with the outcome but I’m afraid Gordon was a little upset over his being taken apart! He eventually got over it. I think. Yet another possible need for therapy later in his life?


Back to the saw…

Over the weekend I was cleaning and attempting to organize my side of the garage. I unscrewed my beloved scroll saw from the workbench and Garth gave the motor a good look to see if it was salvageable. It wasn’t. When I started to carry it to the garbage can Garth asked if I needed him to do it, I looked him in the eye and said “no, I need to do it” It was so hard not to cry!


Goodbye my old friend!

Friday, May 20, 2011

Wire Picture/Note Frames How To!

So, a few years ago, I saw something somewhere that I thought was pretty cool.  So, of course, I decided I could do it just a bit better.  Or, in other words... Do it so I would like it better!

These have been really good sellers at my bazaars.

If you don't care about the how to, just skip on down the pictures...

First, you need to go to your local Home Depot or th equivalent.  Make sure to bring your teenage son to help.  Head on over to the big pile/display of 1x2's.   They come in 8' lengths.  Sometimes it takes a bit to find the straight ones in the pile but you can do it!  I usually buy 10 or more at a time.  They are usually around $1.00 each.  If you can't fit 8 foot boards into your car, have them cut it in half for you.

You can get one frame out of one 8' board but if you want it bigger than roughly 21" square you will need two.  Sometimes I decide the size I'm going to make before I cut them.  More often than not I decide as I'm cutting them.


Here they are all cut and numbered so I don't get them mixed up.

Next, sand the pieces just a bit...


Then Paint them


Sand them again.  The more you sand the more rustic they will look.

Then slap some stain on the pieces.  You can put them together first if you like.  I like to use Minwax water based stain because it dries fast and cleans up with soap and water.  I used to be able to buy it already in the color I wanted but now I have to have the clear base tinted.  I like to use American Walnut.


Screw them together.  I use my nail gun to put them together then screw them for more stability.  Don't forget the glue!


For the wire, I like to use "tie wire"  you can find it at Ace or Home Depot.

It is really greasy though so you should have an old rag or paper towels handy to wipe it off.  I cut my pieces then wipe them off.


Wrap the wire around something round.


Alternate the circles.


If you don't have a staple gun like this one.  You should get one or borrow one!  You will need an air compressor as well.  If you use a home hand stapler (the kind you re-cover chairs with) you will need to use several staples and hammer them down to keep the wire taut.


Stretch the wire and start stapling it into place


When you are finished, the wire will look all crooked and messy.  The beautiful thing about wire is that you can just bend it until it is straight and lovely.


If you want, you can cut out some stars or flowers or hearts and use them too.  I use my band saw to cut them out.  My scroll saw recently died.  More on that later...  You can also buy pre cut shapes at Michaels.


You can use clothespins or not to hold all your pictures and stuff.


So, there you go.  I'm going to put these in my wood etsy shop just as soon as I can figure out an easy way to ship them!